“A small leak will sink a great ship.” - Benjamin Franklin
【目录】
离线配置
在线配置根据LeakCanary Github上的指引即可完成。不过因为公司一些网络上的限制,我只能使用离线配置来引入LeakCanary。
下载离线aar包及依赖文件
首先从Maven上下载LeakCanary的aar包以及依赖的jar包,共有以下五个文件:
- leakcanary-android.aar
- leakcanary-watcher.jar
- leakcanary-analyzer.jar
- leakcanary-android-no-op.aar
- haha.jar
加入项目中
在工程中建立一个目录,可以跟src、res等目录同级,比如YourProject/leakcanary/,然后将上述五个文件放到此目录下。
编辑gradle文件
在Module的build.gradle中加入以下代码:
1 | repositories { |
源码分析
对 LeakCanary 的源码进行分析。
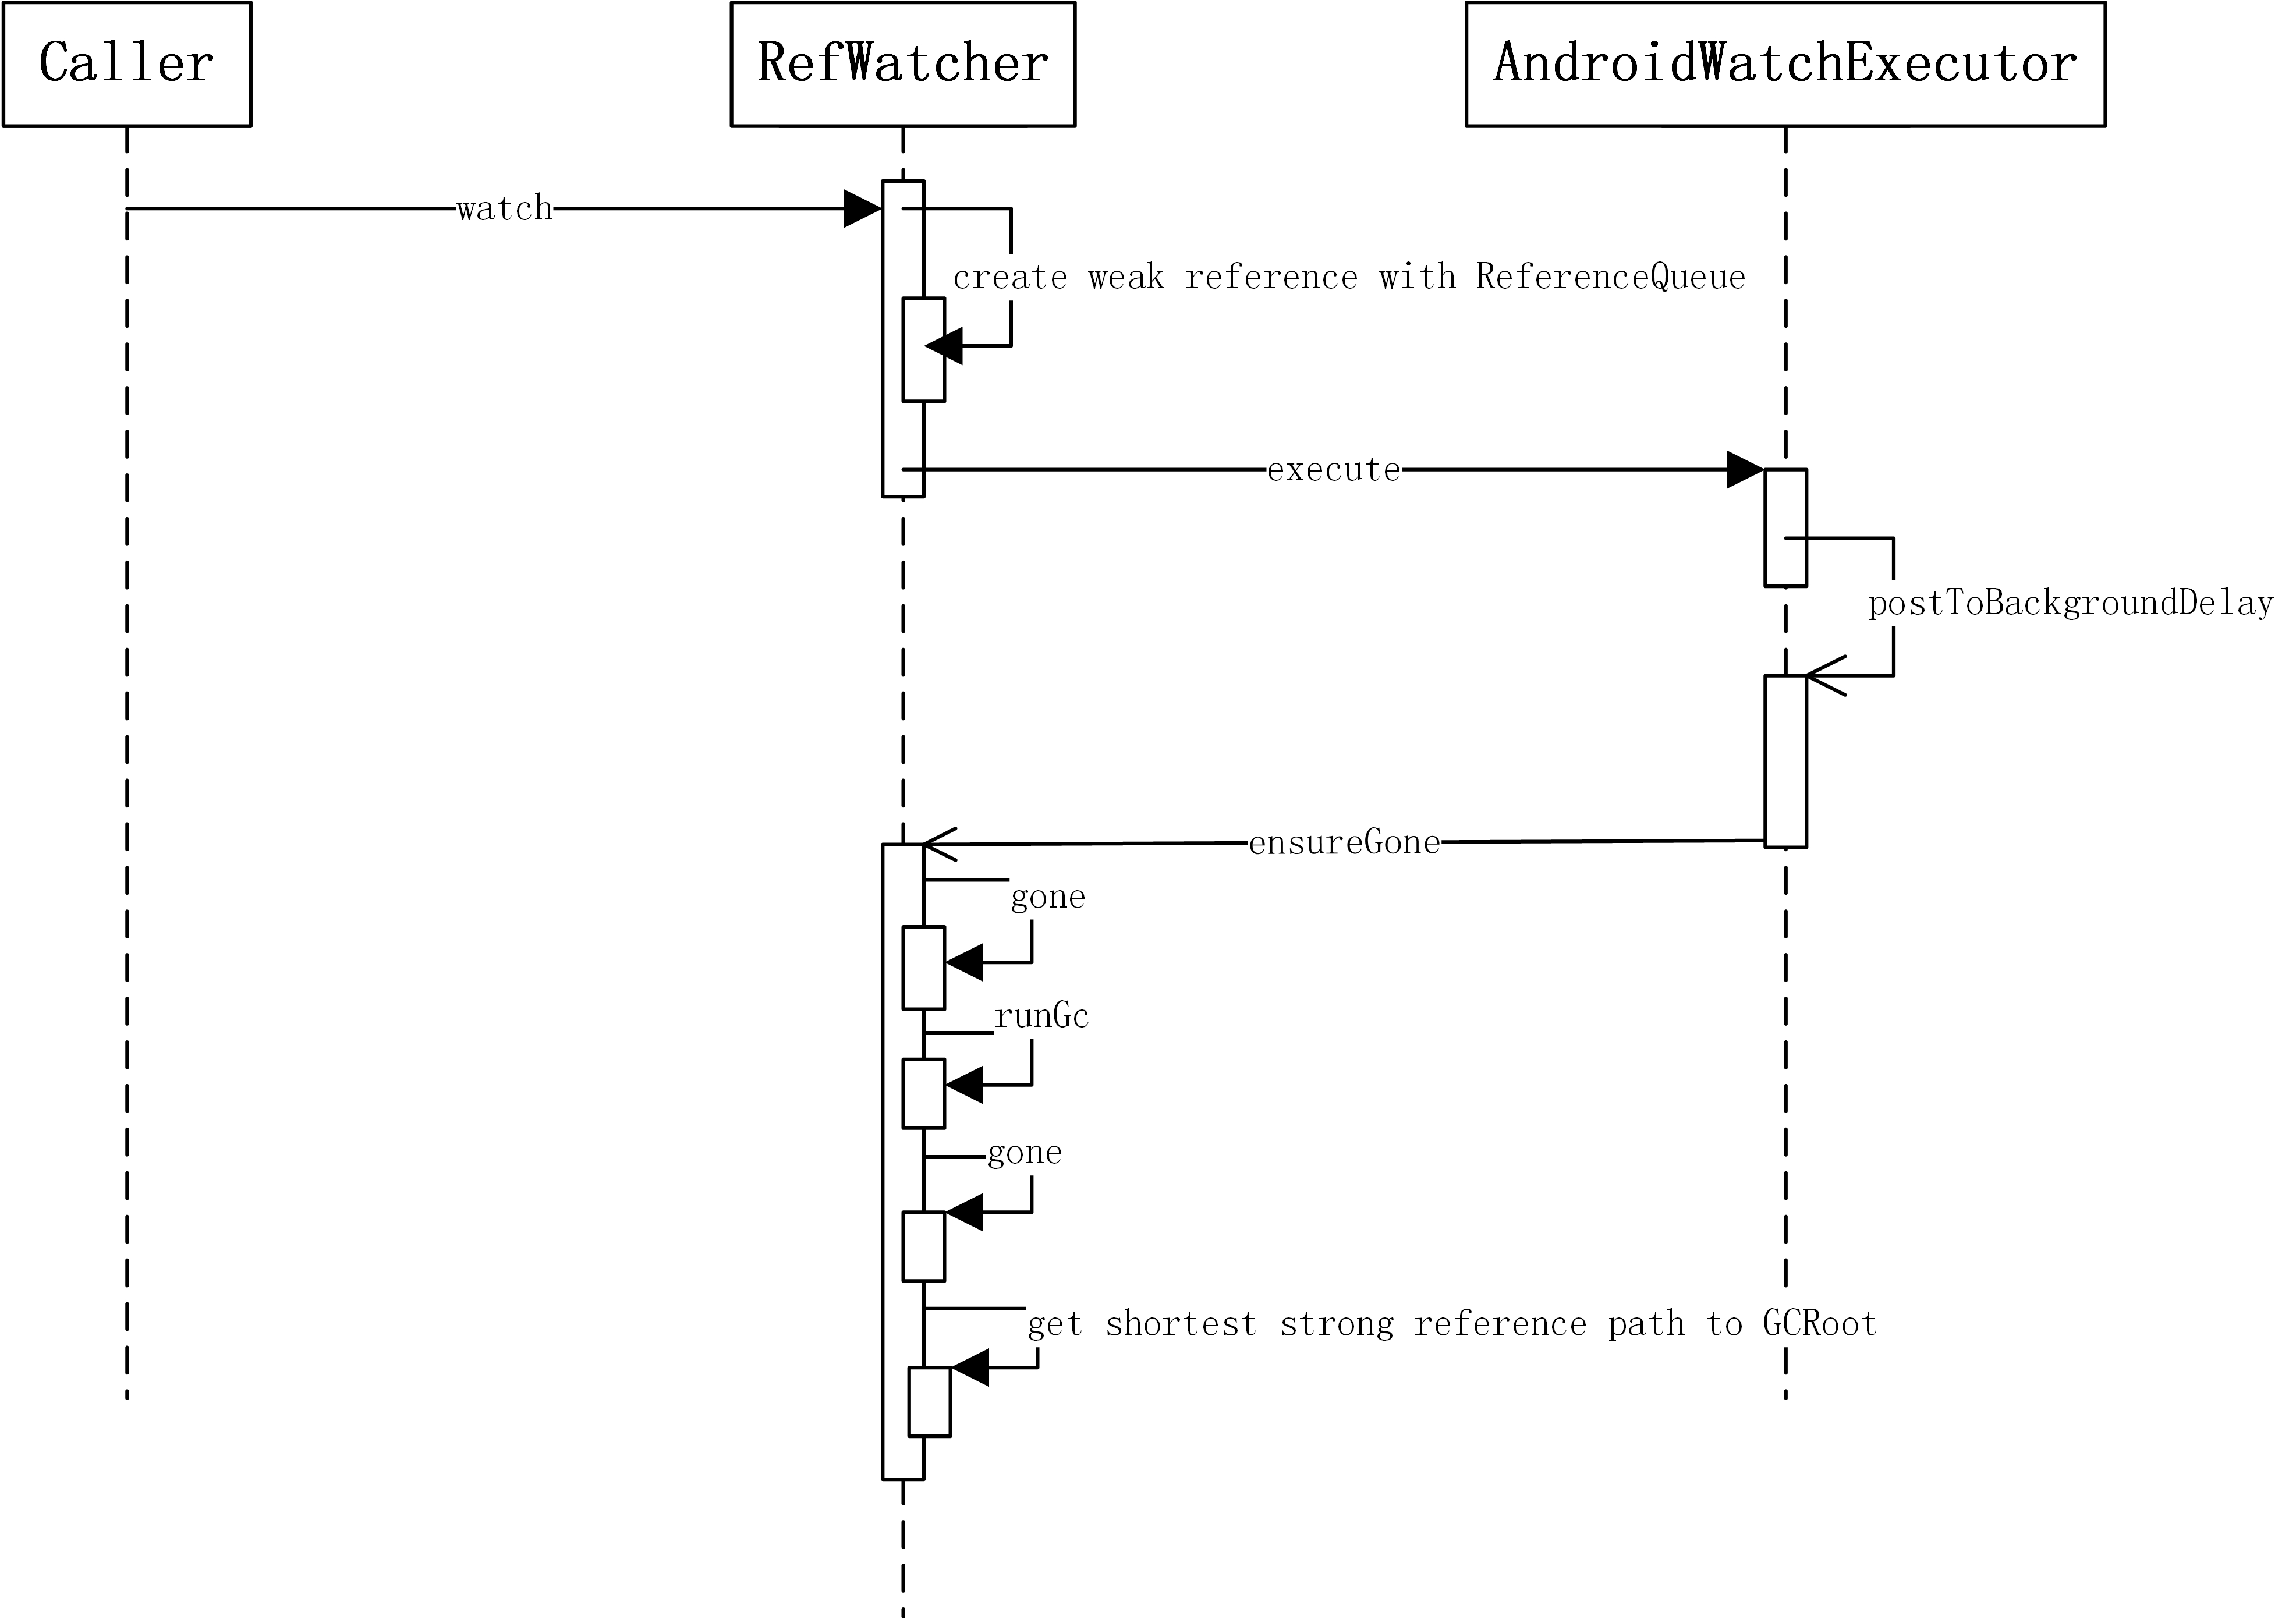
判断是否泄露
先上一张时序图:
其关键代码片段如下:1
2
3
4
5
6
7
8
9
10
11
12
13
14
15
16
17
18
19
20
21
22
23
24
25
26
27
28
29
30
31
32
33
34
35
36
37
38
39
40
41
42
43
44
45
46
47
48
49
50
51
52
53
54
55
56
57
58
59
60
61
62
63
64
65
66
67
68
69
70
71
72
73
74
75
76
77
78
79
80
81
82
83/** RefWatcher.java */
/** 当我们要监视一个对象是否存在泄露时,会调用这个方法 */
public void watch(Object watchedReference) {
watch(watchedReference, "");
}
public void watch(Object watchedReference, String referenceName) {
// ...
// 随机生成一个key,保证key的唯一性
String key = UUID.randomUUID().toString();
// 将key保存在 Set 中
retainedKeys.add(key);
// 创建WeakReference,key是联系 reference 对象和 retainedKeys 的纽带
final KeyedWeakReference reference =
new KeyedWeakReference(watchedReference, key, referenceName, queue);
// 异步判断对象是否存在泄露
ensureGoneAsync(watchStartNanoTime, reference);
}
/** 异步方法 */
private void ensureGoneAsync(final long watchStartNanoTime, final KeyedWeakReference reference) {
watchExecutor.execute(new Retryable() {
public Retryable.Result run() {
return ensureGone(reference, watchStartNanoTime);
}
});
}
/** 检查是否存在泄漏 */
("ReferenceEquality") // Explicitly checking for named null.
Retryable.Result ensureGone(final KeyedWeakReference reference, final long watchStartNanoTime) {
// ...
// 首先将已回收的对象对应的key从retainedKeys中移除
removeWeaklyReachableReferences();
// 如果正在debug断点调试,则延迟执行检查(因为断点会影响准确性)
if (debuggerControl.isDebuggerAttached()) {
// The debugger can create false leaks.
return RETRY;
}
// 通过判断retainedKeys中是否还包含当前的key来判断当前对象是否被回收,
// 如果已被回收,则返回DONE
if (gone(reference)) {
return DONE;
}
// 如果没有被回收,则触发一次GC
gcTrigger.runGc();
// 再次将已回收的对象对应的key从retainedKeys中移除
removeWeaklyReachableReferences();
// 再次判断是否被回收
// 如果被回收则返回DONE,结束
// 如果没有被回收,则需要查找造成泄漏的引用链中最短的一条(一个对象可能被多个对象引用,所以造成泄漏的地方可能不止一处)
if (!gone(reference)) {
// ...
// 获取堆内存镜像文件,最终调用的是Debug#dumpHprofData(String)方法来获取内存镜像
File heapDumpFile = heapDumper.dumpHeap();
if (heapDumpFile == RETRY_LATER) {
// Could not dump the heap.
return RETRY;
}
long heapDumpDurationMs = NANOSECONDS.toMillis(System.nanoTime() - startDumpHeap);
// 启动分析服务
heapdumpListener.analyze(
new HeapDump(heapDumpFile, reference.key, reference.name, excludedRefs, watchDurationMs,
gcDurationMs, heapDumpDurationMs));
}
return DONE;
}
private boolean gone(KeyedWeakReference reference) {
return !retainedKeys.contains(reference.key);
}
private void removeWeaklyReachableReferences() {
// WeakReferences are enqueued as soon as the object to which they point to becomes weakly
// reachable. This is before finalization or garbage collection has actually happened.
KeyedWeakReference ref;
while ((ref = (KeyedWeakReference) queue.poll()) != null) {
retainedKeys.remove(ref.key);
}
}
查找最短强引用路径
查找最短强引用路径的流程如下图: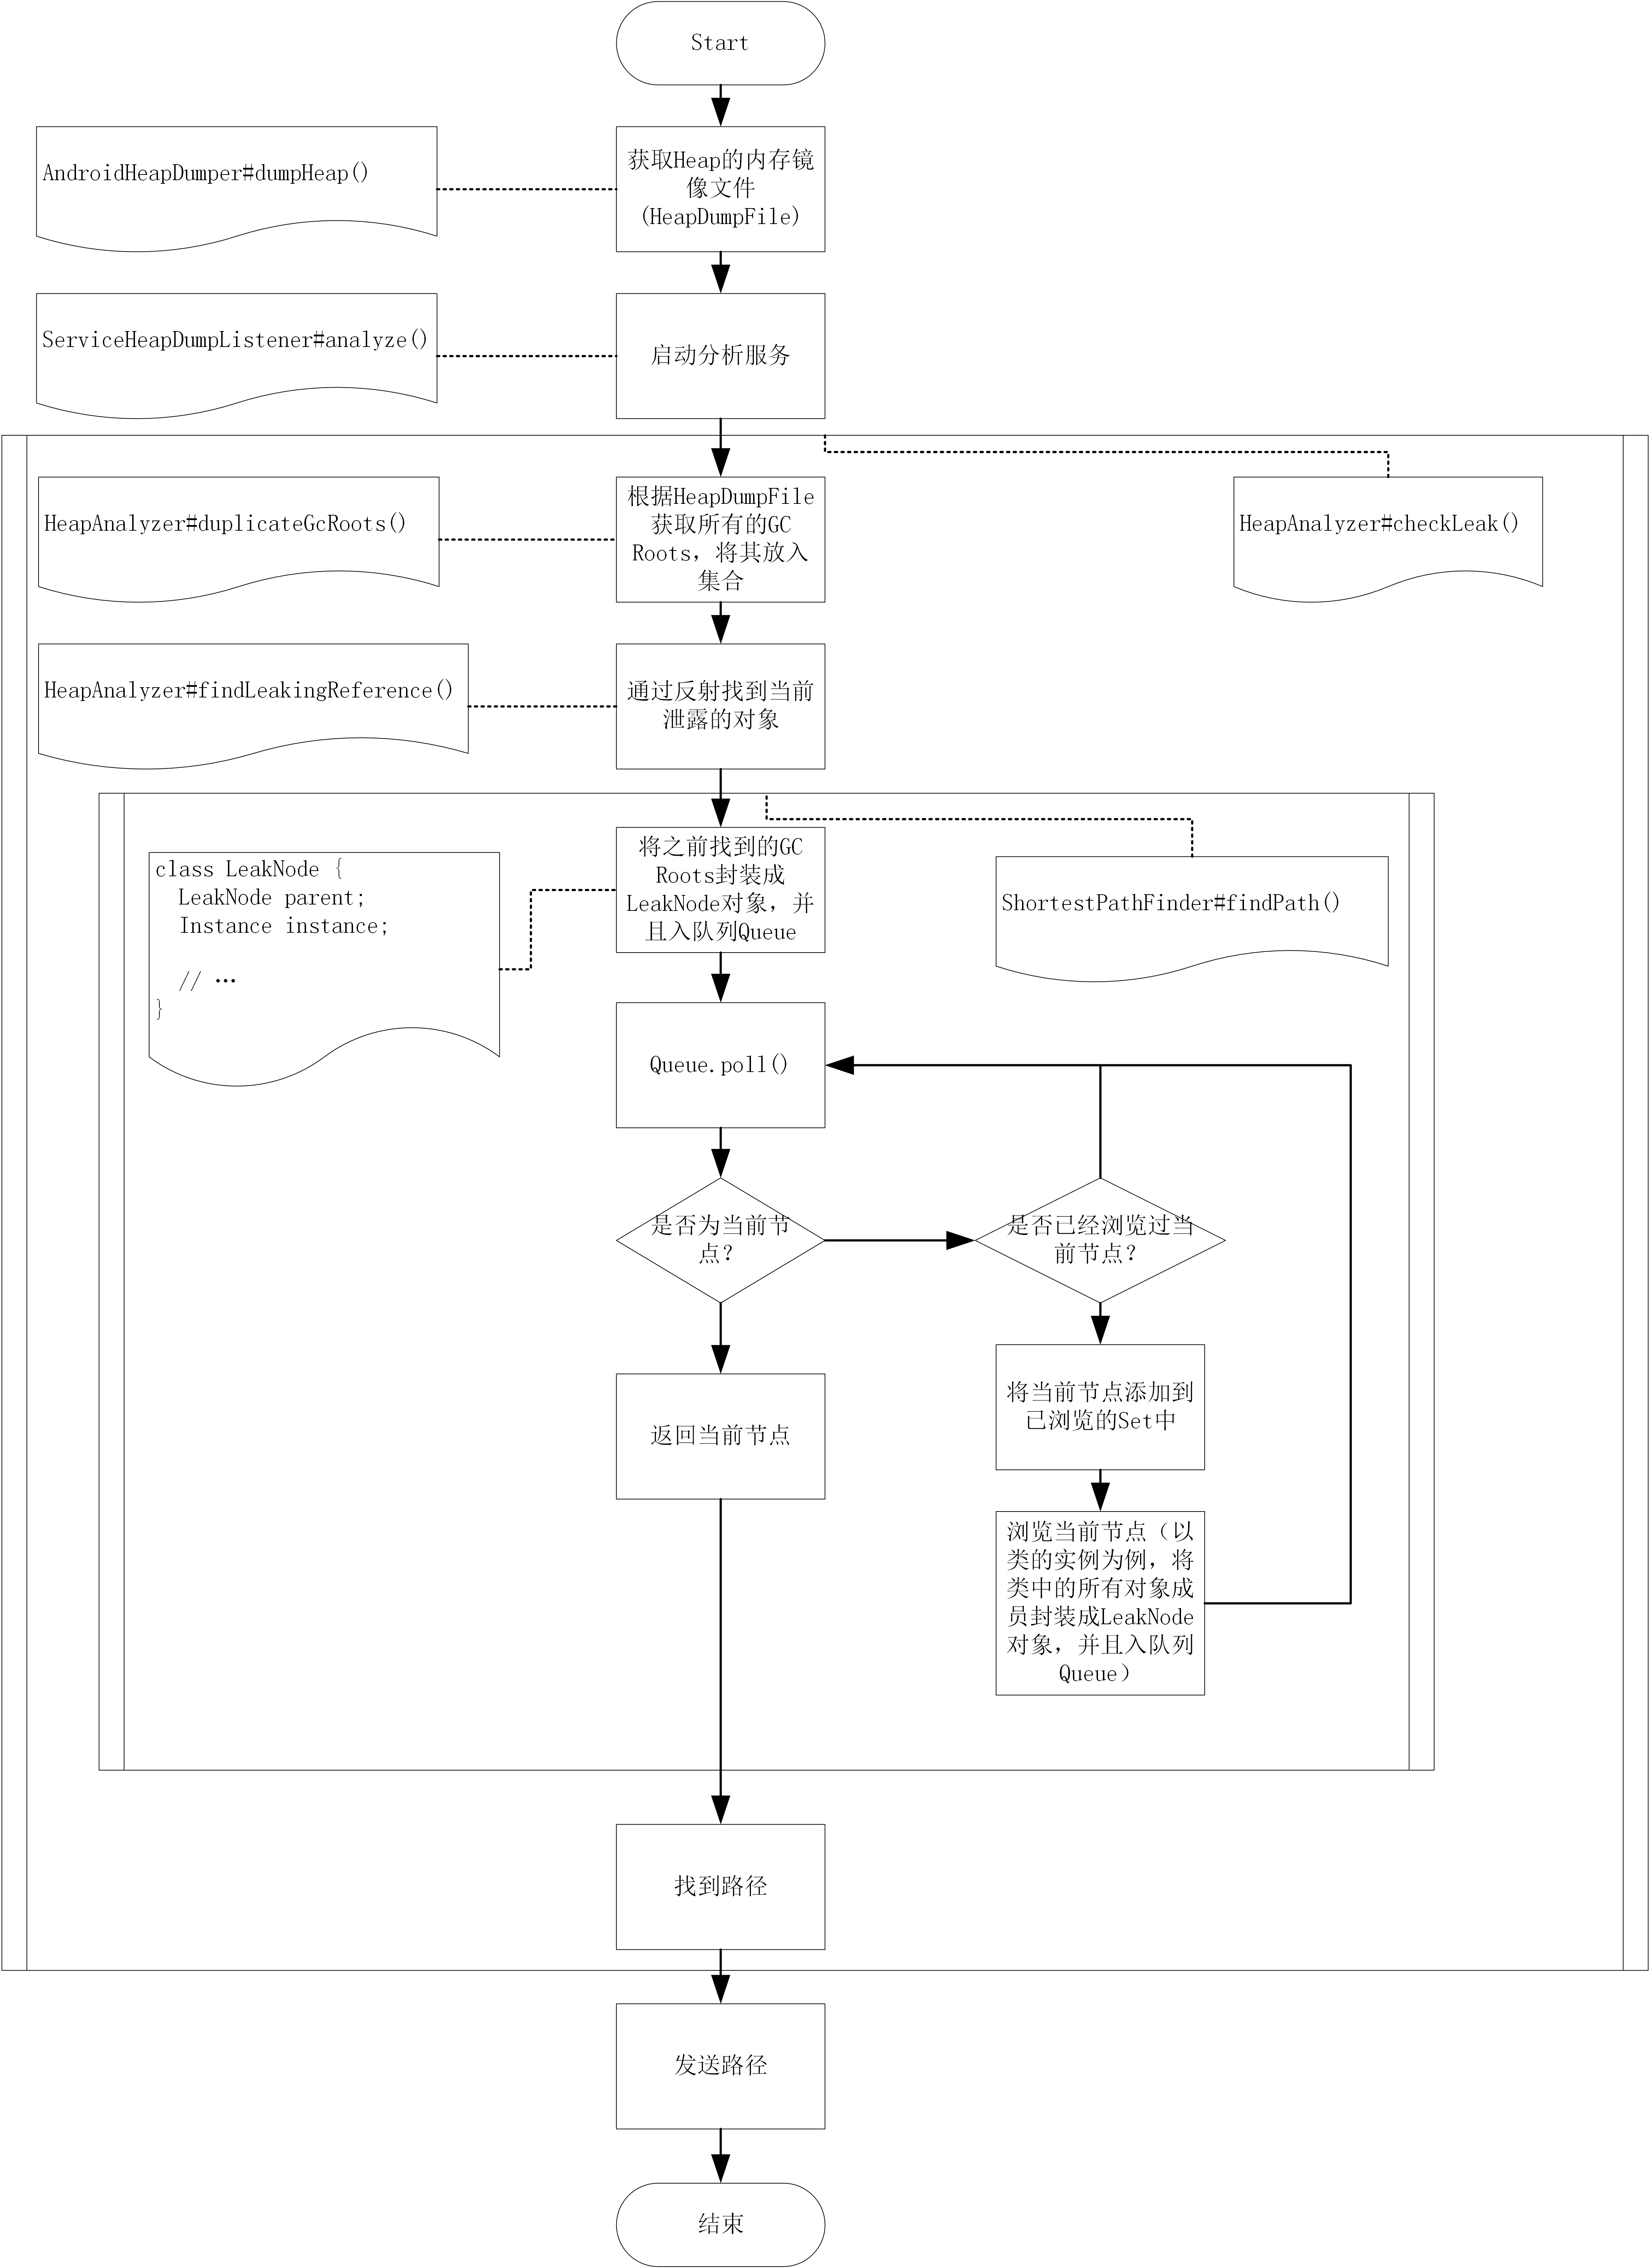
首先来看一下分析服务是如何启动的:1
2
3
4
5/** RefWatcher#ensureGone(KeyedWeakReference, long) */
// 启动分析服务
heapdumpListener.analyze(
new HeapDump(heapDumpFile, reference.key, reference.name, excludedRefs, watchDurationMs,
gcDurationMs, heapDumpDurationMs));
上述代码执行后,会调用ServiceHeapDumpListener#analyze(HeapDump),继而调用HeapAnalyzerService#runAnalysis(Context, HeapDump, Class<? extends AbstractAnalysisResultService>)
1 | public static void runAnalysis(Context context, HeapDump heapDump, |
HeapAnalyzerService是一个IntentService,来看一下它的onHandleIntent方法:
1 | protected void onHandleIntent(Intent intent) { |
HeapAnalyzer#checkForLeak(File, String)是查找最短强引用路径的开端。
1 | /** |
ShortestPathFinder#findPath(Snapshot, Instance)查找最短强引用路径:
1 | Result findPath(Snapshot snapshot, Instance leakingRef) { |
基本代码逻辑分析完毕。
附录
Q: LeakCanary为什么可以自动监视Activity?
A: 答案在于Application.ActivityLifecycleCallbacks接口。具体可以查看ActivityRefWatcher#watchActivities()。
Q: LeakCanary是在onDestroy()方法中对Activity添加监视。因为onDestroy()方法执行后,Instrumentation或其他一些类并没有立即释放对该Activity的强引用,那么它怎么保证得到正确的结果?
A: LeakCanary是“异步”调用ensureGone()方法的。这个异步利用了IDLEHandler的原理。具体代码可查看AndroidWatchExecutor类中的相关方法。